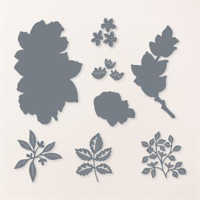
03.08.2025…..Happy Saturday, my stampin’ friends! I had not used the Stippled Roses Dies in awhile, and I’m so glad that I pulled them out today! I used ink, Blending Brushes and a Water Painter to add color to Basic White Thick Cardstock, then several of the dies to cut out the flowers and leaves. Hope this card inspires you to grab some dies that you haven’t used recently, and create some cards and projects, as well.

For this card, I started with Basic White Thick Cardstock, embossed it with the Distressed Tile 3D Embossing Folder, and used Stampin’ Dimensionals to adhere it to a Basic White Thick Cardstock base.
To create the flowers and leaves, I used Blending Brushes to add Bubble Bath, Petunia Pop, Granny Apple Green, and Old Olive to Basic White Thick Cardstock. I then used a Water Painter to splatter water droplets, and dried the cardstock with a Heat Tool. Next, I used a Water Painter, along with White Craft Ink, to add more splattering. After I dried the cardstock with the Heat Tool again, I used the Stippled Roses Dies to cut out all of the flowers and leaves. Once I was happy with the layering and placement, I used Mini Glue Dots and Mini Stampin’ Dimensionals to adhere all of the pieces.
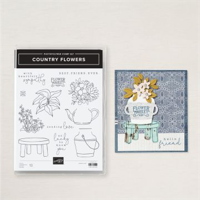
The sentiment (from the Country Flowers Stamp Set) was heat-embossed on Basic Black Cardstock, using my Versamark Pad and White Embossing Powder. For a bit of bling, I sprinkled on embellishments from the Iridescent Pearl Basic Jewels and Purple Adhesive-Backed Sequins (from the recent Sale-A-Bration promotion).
Wishing you creativity always,

To place an order through my Stampin’ Up! Demonstrator Website, click on the shopping cart below…


To place an order, you can click on one of the supply items below: