
 02.27.2020…..Welcome to the weekend, stampers! I’m excited to share two projects with you today, using the Tropical Oasis Suite and the “stamp n’ spritz” technique! (I’ve also included a quick tutorial for the “stamp n’ spritz” technique as well.) I hope my projects will inspire you just a bit, and you have fun experimenting with the “stamp n’ spritz” technique!
Don’t miss the SALE-A-BRATION!
For every $50 you spend in regular Stampin’ Up! products, you can earn FREE merchandise (minimum value of $15.00)…..from the SALE-A-BRATION catalog! By the way, the Nature’s Thoughts Dies that I used on this card are just one of the items that you can earn!)
Browse through the new SALE-A-BRATION catalog!
There is no limit to how much your can earn during SALE-A-BRATION, but this yearly special ends on March 31, 2020.
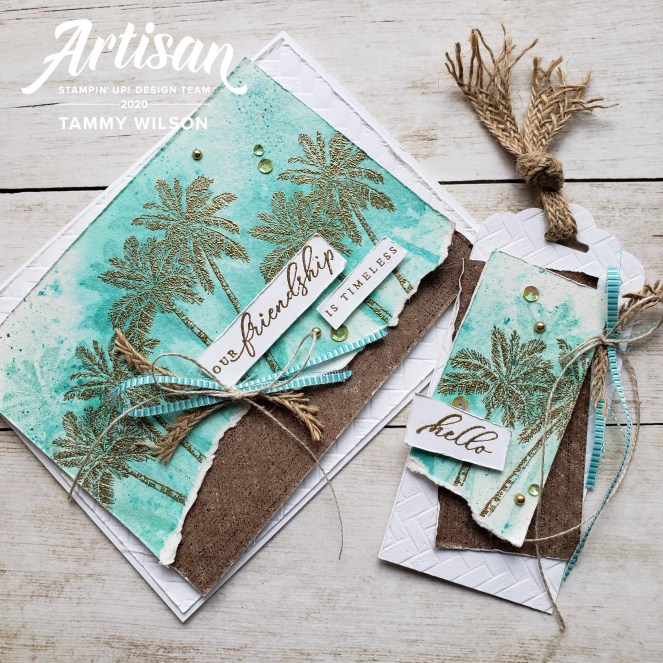
For the card, I started with a piece of Whisper White Cardstock (Item 100730), and embossed it with the Coastal Weave 3D Embossing Folder (Item 151503), and adhered it to a Whisper White Thick Cardstock base.

For the “stamp n’ spritz” technique, I started with a piece of 5” x 7” Fluid 100 Watercolor Paper (Item 149612). I used the palm tree stamp from the Timeless Tropical Stamp Set (Item 151497) to stamp a few of the trees with Coastal Cabana (Item 147097), and then a few more with Bermuda Bay (Item 147096).

I then used a bit of water to mist the paper with my Stampin’ Spritzer (Item 126185), then sat back and watched the magic happen. As the colors started to run together, I also added a few more spritzes here and there. After I was satisfied with the results, I used my Heat Tool (Item 129053) to dry partially dry the paper. While the paper was still damp. I added some speckling with my Bermuda Bay Stampin’ Write Marker (Item 147157), by flicking the thick end of the marker against the marker cap. I then used my Heat Tool once more, to completely dry the paper.

I just love heat-embossing, so I couldn’t resist adding a few heat-embossed palm trees to my card. After I stamped the trees with my Versamark Pad (Item 102283), I sprinkled on some Gold Stampin’ Emboss Powder (Item109129), shaking off the excess powder. I then used my Heat Tool (Item 129053) once again, to heat set the powder.
I trimmed down my paper, from 5” x 7” down to 4” x 5”, so that it would fit on my 4-14” x 5-1/2” card. I also set aside the small vertical piece that I trimmed off one side of the paper to use on my gift tag. (See instructions at the end of this post.)
 After I tore the bottom edge off of the paper, I layered a small strip of Tropical Oasis Designer Series Paper (Item 151252) underneath. I then heat-embossed one of the sentiments from the Timeless Tropical Stamp Set (Item 151497), using Gold Stampin’ Emboss Powder (Item 109129).
After I cut out the sentiment, I popped it up with a few Mini Stampin’ Dimensionals (Item 104430). For some extra texture, I added a bit of 5/16” Braided Burlap Trim (Item 151254) and ¼” Bermuda Bay Mini Striped Ribbon (Item 146939), both cut in half (vertically). Before I adhered the ribbon, I bundled it ribbon together with some (Item 104199). For a little bit of bling, I sprinkled on a couple of gold Metallic Pearls (Item 146282), and a few Iridescent Sequins (144212).

For my little gift tag, I used a 2″ strip of Whisper White Thick Cardstock, punched one end with the Scalloped Tag Topper Punch, and embossed it with the Coastal Weave 3D Embossing Folder. For the focal point, I used that small strip Fluid 100 Watercolor Paper that I trimmed off when I was creating my card. Before I adhered it with a few Stampin’ Dimensionals, I tucked a small strip of Tropical Oasis Designer Series Paper underneath. I then heat-embossed one of the sentiments from the Timeless Tropical Stamp Set (Item 151497), using Gold Stampin’ Emboss Powder.

After I cut out the sentiment, I popped it up with a few Mini Stampin’ Dimensionals (Item 144108). For some extra texture, I added a bit of 5/16” Braided Burlap Trim (Item 151254) and ¼” Bermuda Bay Mini Striped Ribbon (Item 146939), both cut in half (vertically). Before I adhered the ribbon, I bundled it ribbon together with some Linen Thread (Item 104199). For a little bit of bling, I sprinkled on a couple of gold Metallic Pearls (Item 146282), and a few Iridescent Sequins (Item 144212). For the tag hanger, I added some distressed 5/16” Braided Burlap Trim (Item 151254).
Wishing you creativity always,


The new January – June 2020 Stampin’ Up! Mini Catalog and the 2019-2020 Stampin’ Up Annual Catalog are chockful of so many wonderful products! Okay, let’s be honest…..they are absolutely overflowing with some of the most amazing products ever!


