
06.25.20……Welcome to the weekend, stampers! I’m excited to share two projects with you today, using the In Good Taste Suite and the “sponge n’ spritz” technique! (I’ve also included a quick tutorial for the “stamp n’ spritz” technique as well.) I hope my projects will inspire you just a bit, and you have fun experimenting with the “stamp n’ spritz” technique!
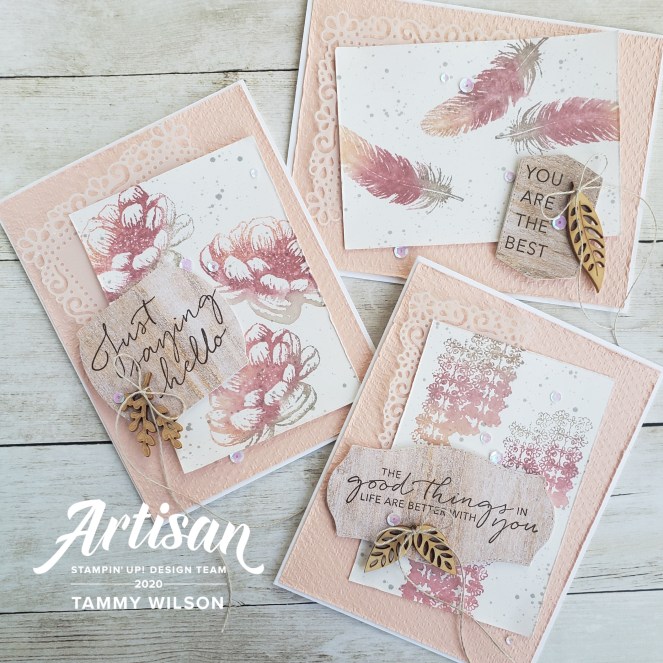
For each of the three cards, I started with a piece of Petal Pink Cardstock (item 146985), embossed it with the Tasteful Textile 3D Embossing Folder (item 152718), and adhered it to a Whisper White Thick Cardstock (item 140272) card base. I then added a piece of Vellum Cardstock (item 101856), which I cut out using one of the Ornate Layers Dies (item 152726).

For the “sponge ‘n spritz” technique, I started with a piece of 3″ x 4-1/4″ Shimmery White Cardstock (item 101910), along with my Petal Pink (item 147108), Rococo Rose (item 150080), and Gray Granite (item 147118) Classic Stampin’ Pads. I used three Sponge Daubers (item 133773) to apply each of the three colors to the stamp. As I applied the ink, I started with the lightest color first and ended with the darkest color. I then used a Stampin’ Spritzer (item 126185) to apply a fine mist of water to the stamp. One spritz is usually enough, but depending on how close you spray to the stamp, you may need another little spritz.
After I spritzed the water on the stamp, I stamped the image on the paper. Each time I stamped an image, I repeated the steps above. (Hint: Keep a couple of paper towels handy so you can dab off any extra water that remains on the stamp before you ink it again.)
Once the images were dry, I used the dark marker from the Gray Granite Stampin’ Blends Combo Pack (item 154886) to add some speckling to the paper. (I created the speckling by “flicking” the thick end of the marker against the marker cap.)

For the first card, I used the flower stamp from the Tasteful Touches Stamp Set (item 152562).

For the second card, I used the feather stamp from the Tasteful Touches Stamp Set.
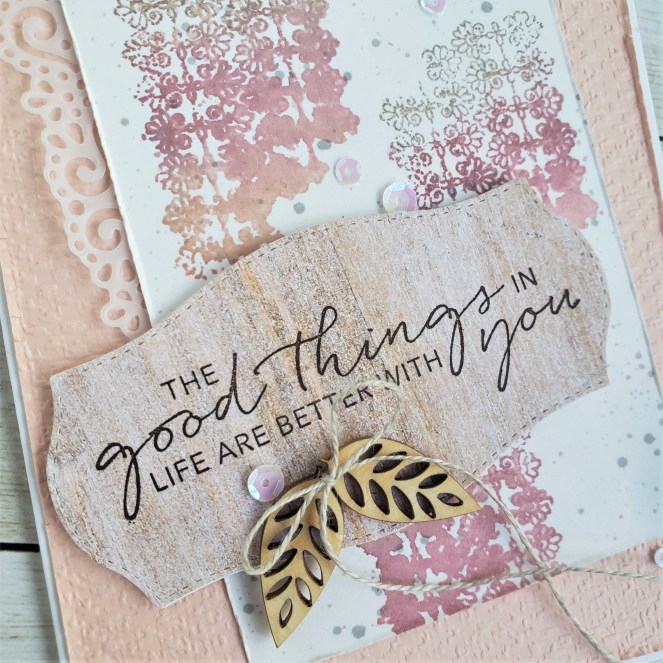
The sentiments on each card were stamped with an Early Espresso Classic Stampin’ Pad (item 147114) on a piece of In Good Taste Designer Series Paper (item 152494) and cut out with one of the Tasteful Labels Dies (item 152886).
After I popped them up with a few Stampin’ Dimensionals (item 104430), I added one of the In Good Taste Elements (item 152476) and a bit of Linen Thread (item 104199). For just a bit of bling, I sprinkled on a few sequins from the Woven Threads Sequin Assortment (item 149498).
I hope my projects have inspired you and that you also have fun experimenting with the “sponge ‘n spritz” technique! I would love to see what you create!
Wishing you creativity always,

The 2020-2021 catalog is sooooo jam-packed with soooooo many amazing stamps sets, accessories, and more….and I know your wish list will be overflowing before you know it!


Such beautiful cards, Tammy! I love all the gorgeous details, plus your use of that simple but “wow” technique!
LikeLike
Thanks for sharing all the steps for these pretty cards, Tammy! Love the soft coloring!
LikeLiked by 1 person